| Functional Art Solutions |
AYNNYD Help Documents: Editor Button Reference
AYNNYD Help Documents:
- Home
- Editor Button Reference
- AYNNYD Who?
- Websites Are Chameleons!
- Design Conventions
- Internet Anatomy
- Glossary
The AYNNYD Editor - TinyMCE
Learn It!
| Editor Button Reference | |
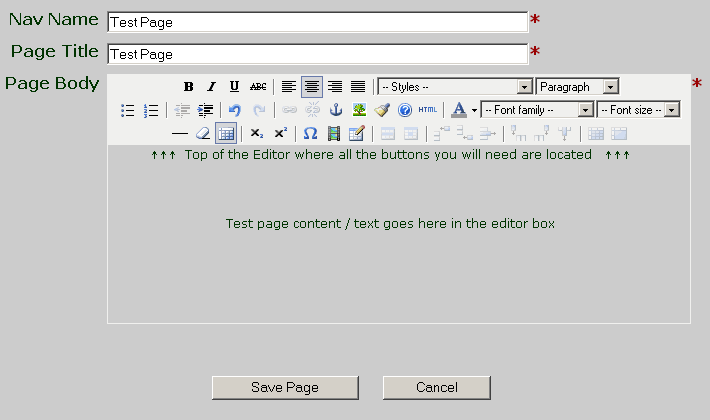
| Screenshot of the AYNNYD Editor In Action. This is how it will actually look when you use it. The button reference is below. | |
 |
|
| Text Editing Features | |
| Bold text | |
| Underline text | |
| Italicize text | |
| Strike through text | |
| Sub text | |
| Super text | |
| Left justify text | |
| Center justify text | |
| Right justify text | |
| Full width justify text | |
| Change text color | |
| Change text background color | |
| Cut content, also available through your browser's edit features. Note if you simply want to move text from one location to another you can highlight, left click down and hold and drag the text to where you want it and release. | |
| Copy content, also available through your browser's edit features | |
| Paste content, also available through your browser's edit features | |
| Insert unordered bullet list | |
| Insert ordered list | |
| Indent item | |
| Outdent item | |
| Undo | |
| Redo | |
| Insert a special character | |
| Website Specific Features | |
| Create link to an Image, PDF, or Page. Must highlight an Image or text before this button will work. | |
| Remove a link. Must highlight and existing link before this will work. | |
| Insert a named anchor, this is used to link to a particular section of a page, when linking to the named anchor, you will need to add "#" followed by the anchor name to the end of the page address. | |
| Insert Image from web server. Note the image must have uploaded to the server first by clicking on the main navbar "Add Image" or by someone else in order to use this feature and the image must belong to the same AYNNYD group as the page you are adding it too. | |
| Insert / embed a media type file such as: |
|
| Browse for a file or link to insert such as: Image, PDF, Page, Media, etc. | |
| Select color | |
| Clean up the code. This will attempt to fix mistakes in the source code. | |
| Remove special formatting | |
| Edit the source HTML code directly, not recommended for use unless you know HTML | |
| Internal TinyMCE help docs, very limited. | |
| Table Features | |
| Toggle Visual Aids, this will show or not show table boundaries | |
| Add or modify table properties | |
| Add or modify table cell properties | |
| Add or modify table row properties | |
| Delete Table ( you can also simply place your cursor to the right of the table and hit the back space button on your keyboard) | |
| Insert table row before | |
| Insert table row after | |
| Delete table row | |
| Insert table column before | |
| Insert table column after | |
| Delete table column | |
| Merge table cells, click in the first row (top to bottom) or first column (left to right) you want to merge, then click this button, then specify the number of columns and or rows you want to combine (i.e. 2 columns, 1 row, will merge 2 columns in one row to 1 column / 1 row or in other words a single cell). NOTE: If you do not modify either the column number or row number to more than 1, this feature will do nothing. | |
| Split table cells. In order to spit cells you MUST have merged them first, then click in the merged cells and you will see this feature activate, then click the Split cells button. | |
| Home | Design | Develop | Maintain | Hosting | Domains | About Us | Contact Us | Clients | Help |
Designed & Hosted by Functional Art Solutions
P.O. Box 248 - Newport, NH - Privacy Policy