| GeekFree WMS Basics |
| |
• KEY CONCEPTS
- Where you are when you click on an Admin link MATTERS!
- ALWAYS navigate to the page, group, or area of the website before you click on an admin link.
- GeekFree WMS tracks where you are, this is important for authorization as well as Group associates (see Groups below).
- If GeekFree WMS is set to only view pages, pdfs, images, etc for the group they are associated with. If you were to add content while viewing one Group, they will not show up while editing another group.
- User Role for a particular Group MATTERS!
- Links and options throughout the website will change based on a Users Role (see Groups, Users, & Roles below)
- New Files are OFFLINE until linked to.
- When you add new Pages & Groups or images, movies, & PDFs to the website, in most cases they are offline until you either link to them from the body of a page or add them to the Navbar.
- To view, edit, delete, or restore any Online or Offline file, simply click on the "All Documents" link on the admin menu.
- Instant Gratification
- Most changes made to an GeekFree WMS website are committed the instant you hit the submit button. This means if you make a mistake, the world will know about it instantly, so please make sure you have checked and double checked your work before making changes. TAKE WARNING, If you make a mistake and remove information you shouldn't have that information will be gone for good, GeekFree WMS currently has no builtin backup for lost data with exception of the entire database backup which is normally set to backup every night.
- Illeagal Actions
- By default if any user attempts to do something they are not authorized to do, they will be automatically logged out and returned to the GeekFree WMS Home Page. Intentional and or Regular Illegal Actions may result in a permanent ban from the website or other more severe penalty.
- If your session times out, you will be logged out.
- If your browser is not returning cookies or other session test variables reliably, you may be logged out.
|
| |
• LOGIN
Note: All logins will expire after a period of inactivity. Each page request will reset your login session time, however, editing a page even though you are typing and clicking buttons will NOT update your timeout period. It is highly recommended you finish all page edits within 30 minutes or so or risk loosing all your edits do to an inactivity timeout.
- In order to login you must first obtain an access account from the website administrator, this may be the person that designed your website or it may be someone within your own organization.
- Once you have obtained login information from the administrator you need to determine the location of the login page:
- If your website has a dedicated Login Link use that link,
- You also may be able use the default login by visiting: http://www.yourdomain.com/geekfree/admin/admin.php, please note you must substitute your actual domain for "www.yourdomain.com" and the "GeekFree" directory may be different for your website.
- If neither of these methods work for determining the correct login location you will need to contact your website administrator to get the address.
- Now visit the login page, input your login name (the email address associated with your account), and your password (case sensative), and click the "Login button".
- If your login was successfull you should have been redirected to the home page of GeekFree WMS, and you should see additional private or administrative links.
- Please contact the website administrator for assistance if "You were able to login before but now you can't".
|
| |
• USERS
- Users can manage their registration information such as password and primary email via the Profile link on the admin menu.
- Admin can also manage or add new Users by clicking on the Users link on the admin menu to access the User Administration Area.
- In the User Administration Area:
- Admin can NOT modify any User with equal rights.
- Admin can NOT see or modify any User with greater rights.
- Admin can View Basic User Info on every User such as User ID, Display Name, Primary Email, and User Roles. The list can be sorted by ID, Display Name, or Primary Email.
- Admin can Activate or Deactive a User by clicking on the "Yes" of "No" link in the Active column on the User list.
- Admin can Add a New User by clicking on the "Add a New User" link above the User list on the User Admin main page.
- Fill out the form and click the Submit Registration button.
- The user is automatically activated and added to the system for immediate login access as a Registered user (see Standard User Roles below).
- Admin may grant Users additional privileges by editing the user (see Editing below).
- Note: A user may also add themselves via the public registration form (if public form is active), in this case the user is not active until an Admin activates them.
- Admin can Edit User Passwords, Info & Roles by clicking on the "Edit" link next to the User in the User list.
- Admin can Edit the User registration information including Password, Primary Email, and Display name, in the Profile section at the top of the page.
- Admin can set different User Privileges at the bottom of the page in the User Member Groups section.
- Each Group typically represents a different defined area of the website for which a user can have a different minimum Role defined.
- The same Group can be assigned to multiple areas or functions of a website.
- You may change one or more Roles by selecting a new Role for each Group listed and then clicking the "Change User Group Role(s)" button.
- There are 2 special types of Groups which only SeniorAdmin and above will see.
- Admin: This group is only for the Admin Area and special Admin services.
- All Access Group: This group adds a User to and assigns a particular Role to all areas and functions of the website.
- Each Role includes a different set of privileges. Typically each Role from Public to SuperAdmin includes all the privileges of the previous role plus new ones.
- See list of Standard User Roles below. Note: your website might have additional defined roles.
- Admin can Delete a User by clicking on the "X" link in the Del column of User list.
- Standard User Roles - each role comes with a different set of privileges. The assigned role determines what privileges a User has access to.
- NOTE: in addition to the standard Roles, other Roles may be defined on individual websites.
- Public: The default public user with frontend view only rights.
- Registered: The default registered user with frontend view only rights to public and registered content.
- Editor: Can Edit existing content. No Admin rights. Can be applied to an individual group or site wide.
- JuniorEditor: Nav, Add, & Edit content. No Admin rights. Can be applied to an individual group or site wide.
- SeniorEditor: Nav, Add, Edit, Delete, and Restore content. No Admin rights. Can be applied to an individual group or site wide.
- JuniorAdmin: Full SeniorEditor rights + Group Mods + user management but no config or setup authority. Can be applied to an individual group or site wide.
- SeniorAdmin: Full JuniorAdmin rights with limited config, and no setup authoring. User has limited authority to modify critical website functions. Reserved for experienced website administrators only, and is always site wide.
- SuperAdmin: Any thing that can be done to the website via GeekFree WMS, the SuperAdmin can do. SuperAdmin authority is always site wide and has full authority to modify critical wesite functions. Usually reserved for the website designer only.
|
| |
• EDITING
Note: Keep editing time short so you don't logout due to inactivity and loose your changes when you click the save button.
Note: You can edit many different types of content using similar steps as outlined below.
- Step 1: Login - you must be logged in to edit any pages.
- Step 2: Navigate to the page you want to edit.
- Step 3: Click the "Edit" link on the main navigation menu, if you do not have an edit link, you are not authorized to edit this item.
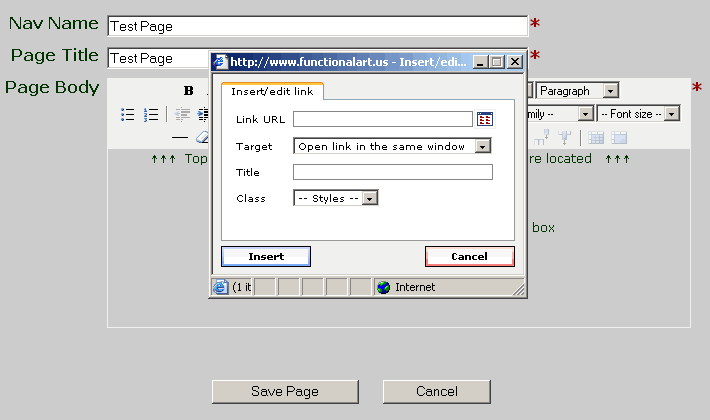
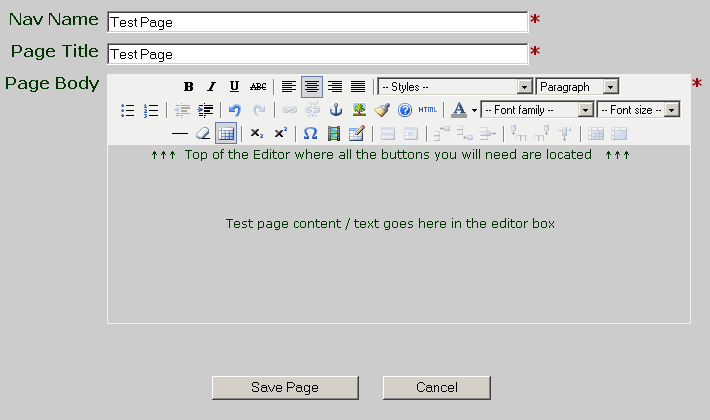
- Step 4: The Content Editor should now be displayed, and you should see icons such as B & I at the top.
- View Screenshot of the Editor.
- If you plan to add multiple images or links in a page, you may wish to first upload them all in one shot using the Upload Files link on the Admin menu.
- Complete The Required fields:
- Nav Name is the short name which will be displayed in drop down lists and the Navigation Links.
- Page Title is full name (if different from Nav Name) which will be displayed as the title of the page. Make sure any "Search Terms" you would like your page to be found for are used in the page title and page body.
- Page Body is where you type or edit the content of a page. Make your changes here and then proceed to Step 5.
- While adding / editing text on the page, note the editor will create a new paragraph when you hit the return key. This creates space above and below the text you just entered. To skip down one line without creating a new paragraph, hold down the shift button when you hit the enter key.
- To Add a Link in editor to a page, image, PDF, or external website, select the text or an image and then Click On the browse
 button. A popup window will appear. If you already know the address for the link you can type it in the "Link URL" box, else you can click on the button. A popup window will appear. If you already know the address for the link you can type it in the "Link URL" box, else you can click on the  button which will popup an second window where you can select an existing File or upload one from your computer. button which will popup an second window where you can select an existing File or upload one from your computer.
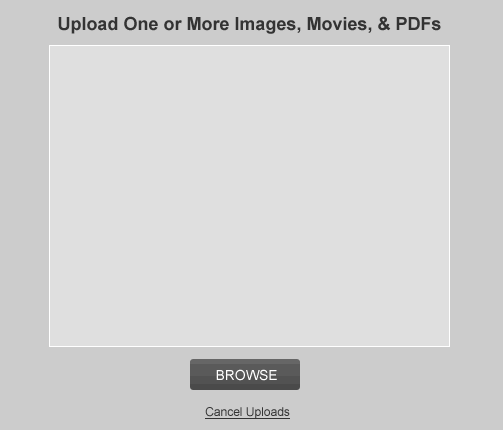
- If uploading a File from your computer, click on the "Browse" button below the big box at the bottom of the second popup. View file uploader Screenshot
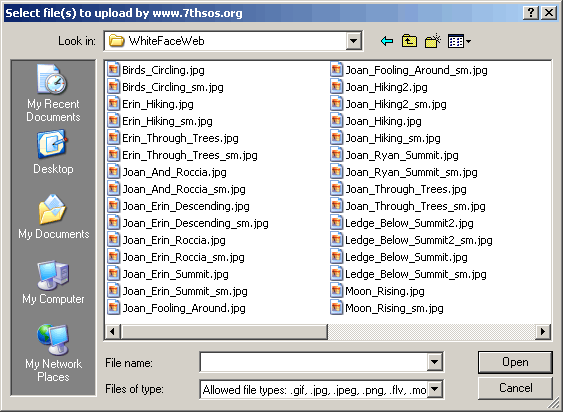
- A third popup will appear after you click the Browse button. View Browse Popup Screenshot
- Browse your computer, select a file, and click the Open button on the last popup window.
- At this point the third popup will close,
- Your file will be uploaded to the website and you will see a progress bar while it uploads,
- Once the file has completed uploading, the screen will appear to pause for a bit while the file is processed on the server,
- When processing completes successufully the upload progress bar will disappear and the second popup will close.
- Your file has successfully been uploaded to the website.
- The Link URL box on the first popup will now contain the URL to the newly uploaded file.
- To open this link in a new window, select the "Open link in a new window" option from the Target drop down list.
- To associate a title with the new file, fill in the box next to "Title". This is helpful for search engines, visually impared, and is what you will see when you hover over the link.
- When finished click the "Insert" button. The first popup will close and your link will now appear in the editor where you had indicated it to be at the beginning.
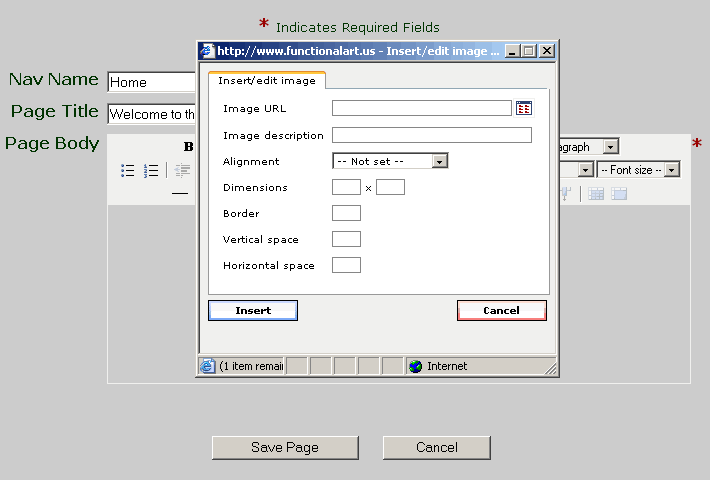
- To Add an Image in the editor, place your cursor where you would like to insert the Image and then Click On the image
 button. A popup window will appear. If you already know the address for the Image you can type it in the "Image URL" box, else you can click on the button which will popup an second window where you can select an existing Image or upload one from your computer. button. A popup window will appear. If you already know the address for the Image you can type it in the "Image URL" box, else you can click on the button which will popup an second window where you can select an existing Image or upload one from your computer.
- If Uploading an Image from your computer, follow the instructions above for uploading a File. Some options are slightly different but procedure is basically the same.
- To Add a Movie in the editor, place your cursor where you would like to insert the Movie and then Click On the media
 button. A popup window will appear. If you already know the address for the Movie you can type it in the "Media URL" box, else you can click on the button which will popup an second window where you can select an existing Movie or upload one from your computer. button. A popup window will appear. If you already know the address for the Movie you can type it in the "Media URL" box, else you can click on the button which will popup an second window where you can select an existing Movie or upload one from your computer.
- If Uploading a Movie from your computer, follow the instructions above for uploading a File. Some options are slightly different but procedure is basically the same.
- Step 5: Click "Save Page" button and your changes will be committed immediately, the next time you view the page or content item the changes will be reflected.
- Editing Tips - READ THESE, They will help you!
- It is highly recommended you do NOT copy and paste preformatted content from a Word Processor into the Editor as this can cause formatting issues that will require advanced knowledge to remove.
- Use a plain text editor to create your content text or copy your Word Processor content to a plain text editor (this will remove special formatting) and then copy and paste that into the editor and add your formatting there.
- View & Learn the "Editor Button Reference"
- Hover over the Editor buttons to get an idea of what they do.
- Highlight text first to enable many of the buttons.
- Use the undo button to reverse your last action.
- Use the clear formatting button to remove text formatting.
- Many buttons can undo things or change properties as well.
- After you save your changes, justification and font sizes / colors may change due to site wide styling.
- To delete tables or images quickly, place cursor to the right of the table or image and hit the backspace button.
- Use tables to help format the page layout the way you want. Tables force justifications and content to stay in its box.
- To nest tables, add table outside of any table, then cut and paste table to the table cell you wish.
- If you know HTML and you can't get the editor to do exactly what you want, click the HTML button and edit the source code directly.
- If you really mess up a page while editing it, DON'T save the page, simply click on the Cancel button, your changes will not be saved.
- Pop Up Blockers MUST be disabled in order to browse in the Editor for pages and images to link to.
- Javascript MUST be enabled in your browser in order to edit an GeekFree WMS website.
- Cookies are RECOMMENDED to be enabled in your browser. Cookies are REQUIRED for GeekFree WMS Administrators.
|
| |
• PAGES
Pages are the basic building block of any website. Pages can stand alone or be associated with a Group (see Groups below). To create a page follow the steps below.
- Step 1: Login - you must be logged in to create a page.
- Step 2: Navigate to the area of the website where you wish to create a new page.
- Step 3: Click the "Create Page" link on the main navigation menu, if you do not have a Create Page link, you are not authorized to create a page.
- Step 4: The Content Editor should now be displayed, and you should see icons such as B & I at the top. View Screenshot of the Editor..
- If you plan to add multiple images or links in a page, you may wish to first upload them all in one shot using the Upload Files link on the Admin menu.
- Complete The Required fields:
- Nav Name is the short name which will be displayed in drop down lists and the Navigation Links.
- Page Title is full name (if different from Nav Name) which will be displayed as the title of the page. Make sure any "Search Terms" you would like your page to be found for are used in the page title and page body.
- Page Body is where you type or edit the content of a page. Make your changes here and then proceed to Step 5.
- While adding / editing text on the page, note the editor will create a new paragraph when you hit the return key. This creates space above and below the text you just entered. To skip down one line without creating a new paragraph, hold down the shift button when you hit the enter key.
- To Add a Link in editor to a page, image, PDF, or external website, select the text or an image and then Click On the browse button. A popup window will appear. If you already know the address for the link you can type it in the "Link URL" box, else you can click on the button which will popup an second window where you can select an existing File or upload one from your computer.
- If uploading a File from your computer, click on the "Browse" button below the big box at the bottom of the second popup. View file uploader Screenshot
- A third popup will appear after you click the Browse button. View Browse Popup Screenshot
- Browse your computer, select a file, and click the Open button on the last popup window.
- At this point the third popup will close,
- Your file will be uploaded to the website and you will see a progress bar while it uploads,
- Once the file has completed uploading, the screen will appear to pause for a bit while the file is processed on the server,
- When processing completes successufully the upload progress bar will disappear and the second popup will close.
- Your file has successfully been uploaded to the website.
- The Link URL box on the first popup will now contain the URL to the newly uploaded file.
- To open this link in a new window, select the "Open link in a new window" option from the Target drop down list.
- To associate a title with the new file, fill in the box next to "Title". This is helpful for search engines, visually impared, and is what you will see when you hover over the link.
- When finished click the "Insert" button. The first popup will close and your link will now appear in the editor where you had indicated it to be at the beginning.
- To Add an Image in the editor, place your cursor where you would like to insert the Image and then Click On the image button. A popup window will appear. If you already know the address for the Image you can type it in the "Image URL" box, else you can click on the button which will popup an second window where you can select an existing Image or upload one from your computer.
- If Uploading an Image from your computer, follow the instructions above for uploading a File. Some options are slightly different but procedure is basically the same.
- To Add a Movie in the editor, place your cursor where you would like to insert the Movie and then Click On the media button. A popup window will appear. If you already know the address for the Movie you can type it in the "Media URL" box, else you can click on the button which will popup an second window where you can select an existing Movie or upload one from your computer.
- If Uploading a Movie from your computer, follow the instructions above for uploading a File. Some options are slightly different but procedure is basically the same.
- Step 5: Click "Save Page" button and your new page is added to the content management system.
- Now that you have completed creating a page you have 3 options:
- View / Edit the page: click the "All Documents" link and then on "Get List" link next to "Pages to View:" in All Documents, find the page you created and click the "View" or "Edit" links to the right of it.
- Link to the new page from another page:
- Navigate to the page you wish to link to this one, click "Edit",
- In the Editor, select the text or image you wish to be the link,
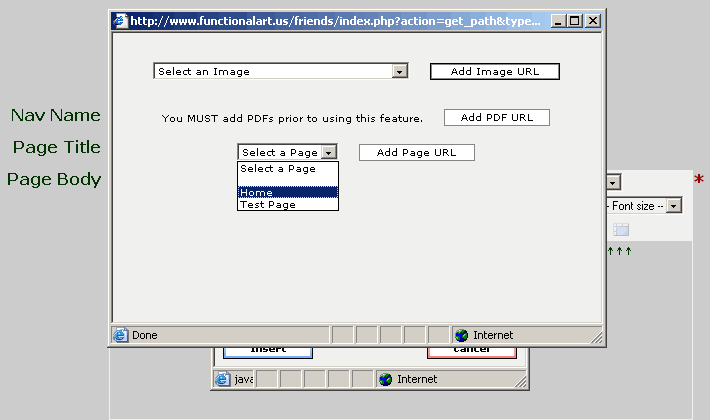
- Click on the button on the middle row at the top of the Editor,
- A Pop Up window should now appear, in the popup window click on the button,
- A Second Pop Up window should now appear, if this did not happen make sure you allow pop ups from this website, in the new popup window select the page from the drop down menu you wish to link to and click the "Add Page URL" button next to the drop down menu,
- The Second Pop should have closed, now click the "Insert" button on the first Pop Up window,
- All the Pop Ups should be closed now, you should be back the the main editor screen, and the text you selected step 2 should now be underlined and look like a link.
- Now click the "Save" button at the bottom of the Editor,
- You are finished linking to the new page. You should now be viewing the page like normal and should be able to click on the newly created link and be redirected to the page you selected from the drop down menu in step 5.
- View Screenshot of Editor & Pop Ups.
- Add new page to the Navigation menu:
- Click on the "Navbar" link,
- In the "Add Navigation Links" box at the bottom of the page, select your newly created page from the drop down menu next to "Link to Pages",
- Next click the "Add Link" button at the bottom of the "Add Navigation Links" box,
- Your done. The page should now have refreshed and the new link should now appear on the Navigation menu.
- View Screenshot of Navbar Service.
|
| |
• GROUPS
- Groups are a way to organize your website and navigation links into sections of similar content. Say your organization is broken into different departments and say you want each department to have its own identity on the website, you would then create a group for each department. Now each department / Group, can add its own images, pdfs, pages, etc and can add separate "Sub" links to this content on this Group's main navigation menu. Also important to note, if set, only members of this Group can have access to this Group and depending on the User's Role certain privileges such as Add, Edit, and Delete functions.
- Groups have all the same properties as regular pages plus they can contain sub-links on the navigation menu. You create and link to them in the same manner you would a page.
- To add a Group, click on the "Create Group" link in the admin menu.
- Now follow the instructions in the Pages section under "Complete The Required fields".
- Once you have created a group, and added that group to the "Navbar", navigate to that group, add pages and other content while still in that group, then you can add that content to the Group sub menu by clicking the "Navbar" link while still at the group page, and selecting the Sub-links you'd like to add.
|
| |
• SERVICES
- Services are special code add ons designed to perform a specific function or manage special content that only an GeekFree WMS developer can add. The Forum, Gallery, Events Calendar are example of Services that manage special content. The Login Form, Contact Form, and Upload Files Form are examples of Services the perform a specific function.
|
| |
• IMAGES, PDF's, & MOVIES
- Multiple Images, PDF's, & Movies may be uploaded to the website any time by clicking on the Upload Files link in the admin menu. NOTE: If an Image, PDF, or Movie exceeds the GeekFree WMS Maximum allowable file size you will NOT be able to upload them using the GeekFree WMS upload form, instead you will need to upload them to the website using FTP then you can import them by clicking on the Import Files link in the admin menu.
- To upload one or more Images, PDF's, & Movies:
- Click on the "Upload Files" link,
- Click on the "Browse" button and select the files you wish to upload from your computer. View Upload Files Screenshot
- Now that you have selected the files you wish to upload click on the Open button and each file will automatically get uploaded to the website and added to the content management system. View Popup Screenshot
- Now that you have completed uploading the file(s) you have the 4 options with what to do with it:
- View / Edit the File: click the "All Documents" link and then on "Get List" link next to "Images to View:" in All Documents, find the Image you created and click the "View" or "Edit" links to the right of it.
- Link to the new File from another page:
- Navigate to the page you wish to link to this file, click "Edit",
- In the Editor, select the text or image you wish to be the link,
- Click on the button on the middle row at the top of the Editor,
- A Pop Up window should now appear, in the popup window click on the button,
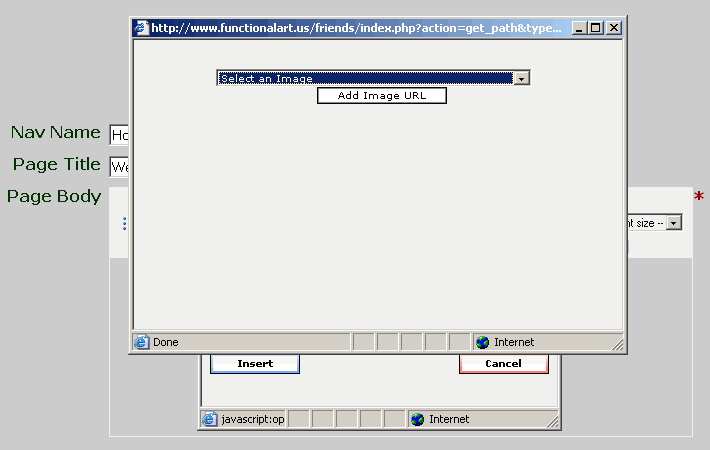
- A Second Pop Up window should now appear, if this did not happen make sure you allow pop ups from this website, in the new popup window select the image from the drop down menu you wish to link to and click the "Add Image URL" button next to the drop down menu,
- The Second Pop should have closed, now click the "Insert" button on the first Pop Up window,
- All the Pop Ups should be closed now, you should be back the the main editor screen, and the text you selected step 2 should now be underlined and look like a link.
- Now click the "Save" button at the bottom of the Editor,
- You are finished linking to the new image. You should now be viewing the page like normal and should be able to click on the newly created link and be redirected to the image you selected from the drop down menu in step 5.
- View Screenshot of Editor & Pop Ups.
- Add the new File to an existing page:
- Navigate to the page you wish to add to this file to, lets assume it's an image, click "Edit",
- In the Editor, place your cursor where you wish the image to be added,
- Click on the button on the middle row at the top of the Editor,
- A Pop Up window should now appear, in the popup window click on the button,
- A Second Pop Up window should now appear, if this did not happen make sure you allow pop ups from this website, in the new popup window select the image from the drop down menu you wish to link to and click the "Add Image URL" button next to the drop down menu,
- The Second Pop should have closed, now click the "Insert" button on the first Pop Up window,
- All the Pop Ups should be closed now, you should be back the the main editor screen, and the text you selected step 2 should now be underlined and look like a link.
- Now click the "Save" button at the bottom of the Editor,
- You are finished linking to the new image. You should now be viewing the page like normal and should be able to click on the newly created link and be redirected to the image you selected from the drop down menu in step 5.
- View Screenshot of Editor & Pop Ups.
- Add new File to the Navigation menu:
- Click on the "Navbar" link,
- In the "Add Navigation Links" box at the bottom of the page, select your newly created File from the drop down menus,
- Next click the "Add Link" button at the bottom of the "Add Navigation Links" box,
- Your done. The page should now have refreshed and the new link should now appear on the Navigation menu.
- View Screenshot of Navbar Service.
|
| |
• NAVIGATION MENUS
Note: To add a link to the navigation menu you must first have created a page / group, or uploaded an image, movie, or pdf (see appropriate section in help docs) and be a JuniorEditor (see Users->Roles) or better.
- Navigate to the section of the website you wish to add a link to.
- Click on the "Navbar" link on the admin menu.
- At the TOP of the page you will see a complete list of existing links where you can:
- Reorder the list of links
- Activate or Deactive a link
- Click on "Edit" to edit the link file
- Delete the link from the navigation. NOTE: this does not delete the File associated with the link, it only deletes the link.
- At the BOTTOM of the page you will see a the "Add Navigation Links" menu:
- Here you will see a drop select list of each type of document available for adding to the navigation menu
- Select a link, and click the "Add Link button" and your link will be displayed in the link list above.
- Now you may click on the UP or DOWN arrows to reorder the links as you see fit.
|
| |
• BUG REPORTS
A strong effort has been undertaken to make GeekFree WMS the best WCMS it can be and to insure GeekFree WMS functions properly at all times with an easy to use interface, however, it is regrettable that from time to time, especially with the release of new features you might discover imperfections in the programming that despite thorough testing was missed. Please report all programming bugs you find or other oddities or suggestions for improvement to your website administrator, and or directly to Functional Art Solutions via our Contact Us form. Together we can make this a better product for everyone.
|
|